Step 5: Callout Template Response Actions
Define Response Actions
Here you will define what actions to take based on received response. We have provided you with a guide on how to use each of these response action types.

Click on the “+” icon on the right side to add new actions. You will be able to select the type of action you want to take.

NOTE: You can change the order of your actions by clicking on the arrows to the right of each action. The actions will run in the order you have defined them.

NOTE: You can clone an action by clicking on the clone button to the right of each action. It will create a copy of the selected action.

Each action can have a label (optional field), to easily identify the actions when you have a lot of them.
Update Main Record
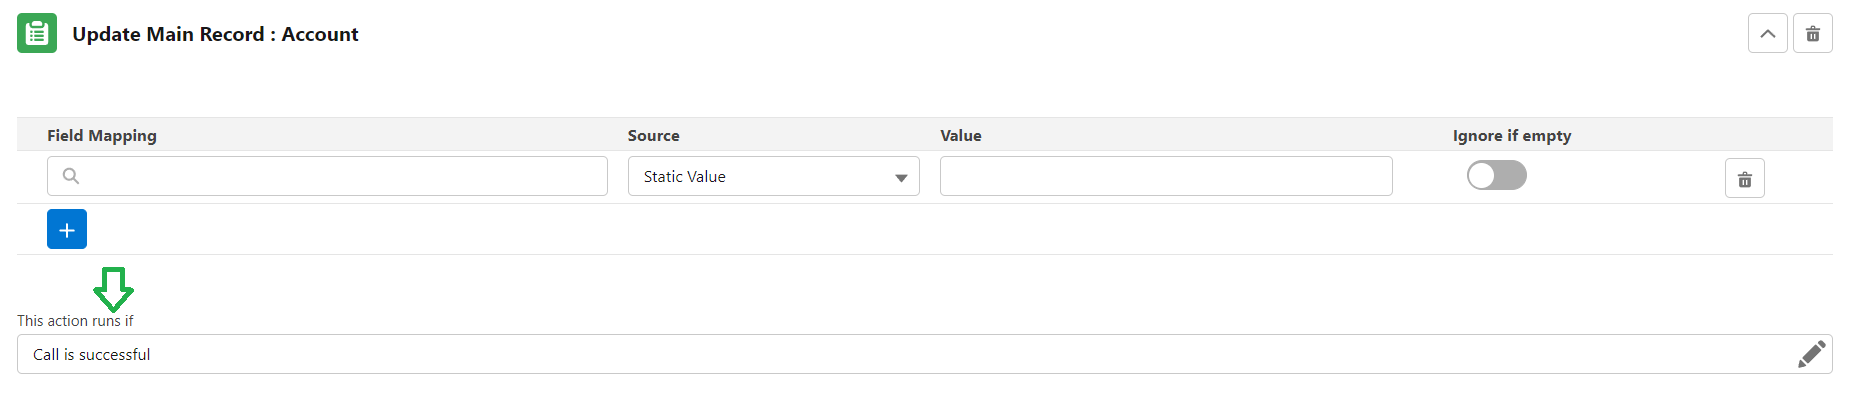
This is the main response action type. This is available if you selected a Main Object in the first step of the wizard. Using this action, you will be able to update the record this callout started from, based on the response.

To select which fields you want to update, click on “+” icon under Field Mapping. In the first input, you will be able to search from a list of fields from the Main Object to update.

In the “Source” dropdown, you can see the available options to map into that field.
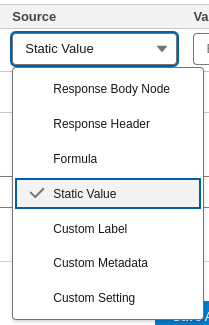
- If you choose Static Value, the field will be updated with that exact provided value every time the callout is made. You can provide the specific value in the “Value” field. This is useful if you want to set a status or a flag on the record.
- Selecting Response Body Node will allow you to update the field with a value or an entire node from the Response Body:

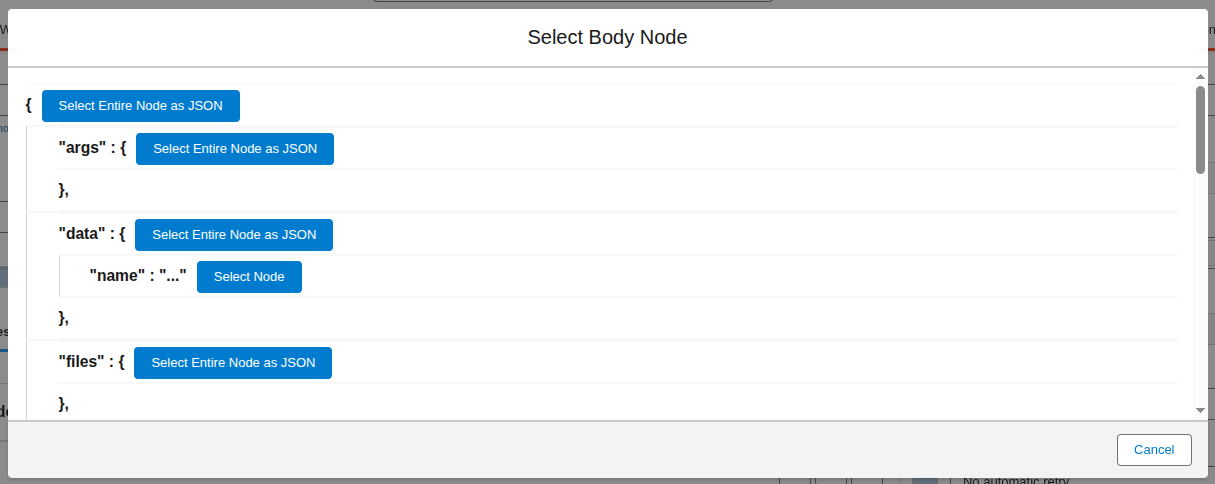
- Click on the Edit icon at the right of the Value input to select a response body node to use to map into the field

- If you encounter a list, you also have the option to add a filter on that list BEFORE clicking on “Select Node”. If you set the filter and it’s part of the JSON path, the filter will be included in the selected path and will be applied when the node is saved in the field.

- You are also able to select an entire JSON node to be stored as JSON in a Salesforce text field. Simply click the Select Entire Node as JSON button to map the whole JSON node into the field.
- Response Header: Selecting this option allows you to save a received response header into a field.
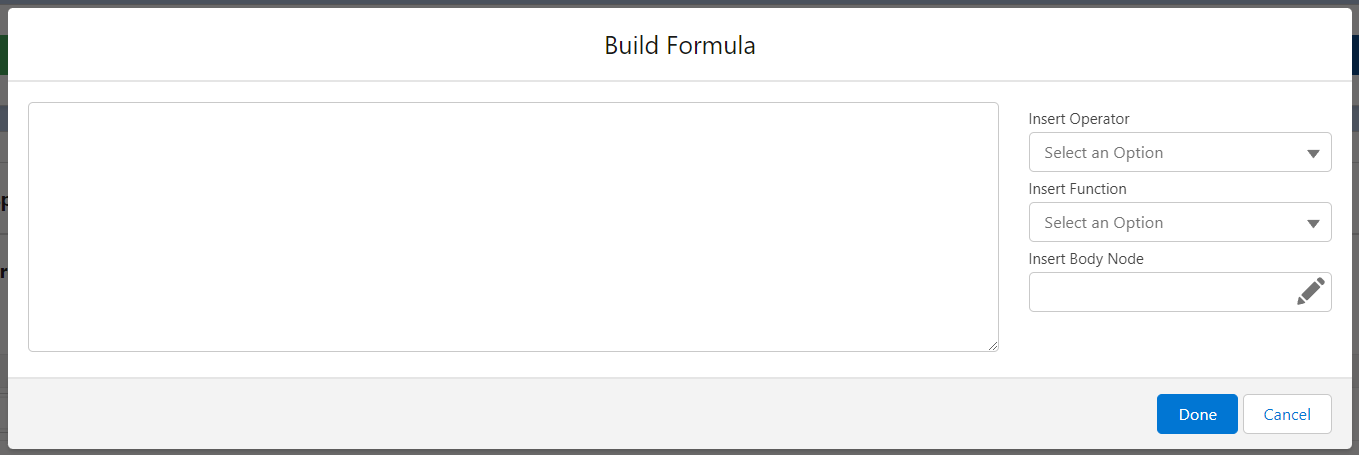
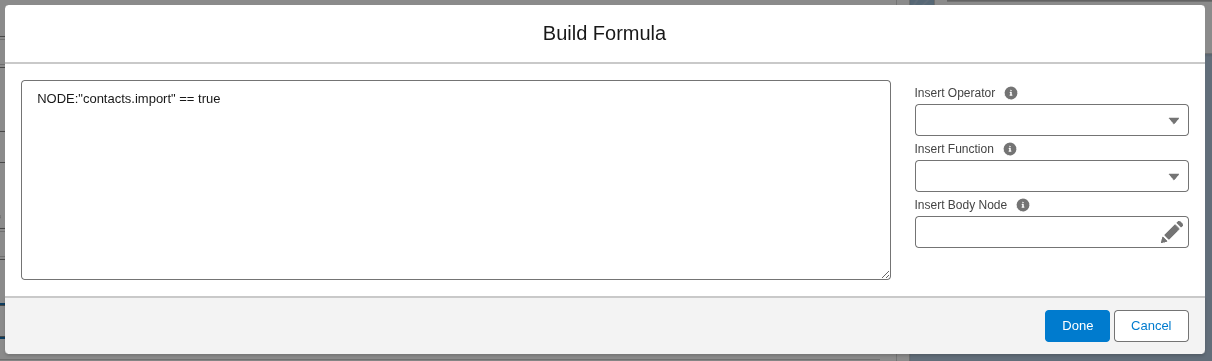
- Formula: This allows you to build a formula using values from the response body.

- Click the Edit icon to edit the formula. See more details in the “Using Formulas” section of this user guide.
- Custom Label: This option allows you to provide a custom label name to be mapped in that node.
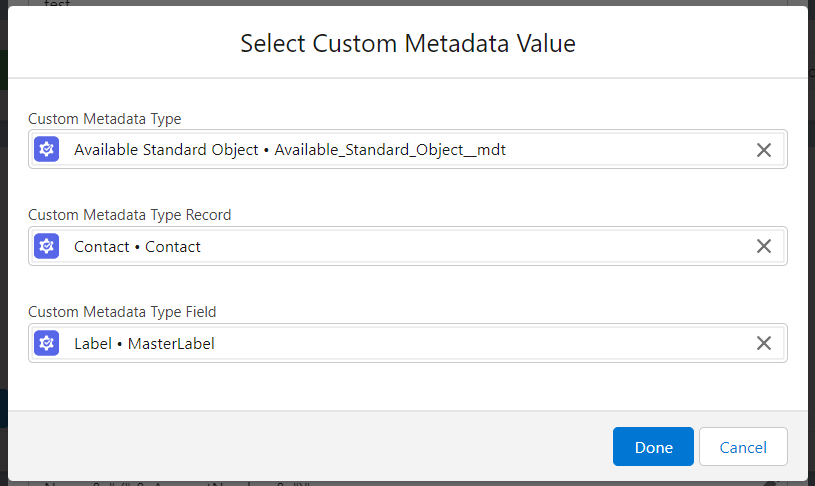
- Custom Metadata: This allows you to map a field from a Custom Metadata Type record into the record field.

- Click on the Edit icon to select a custom metadata value
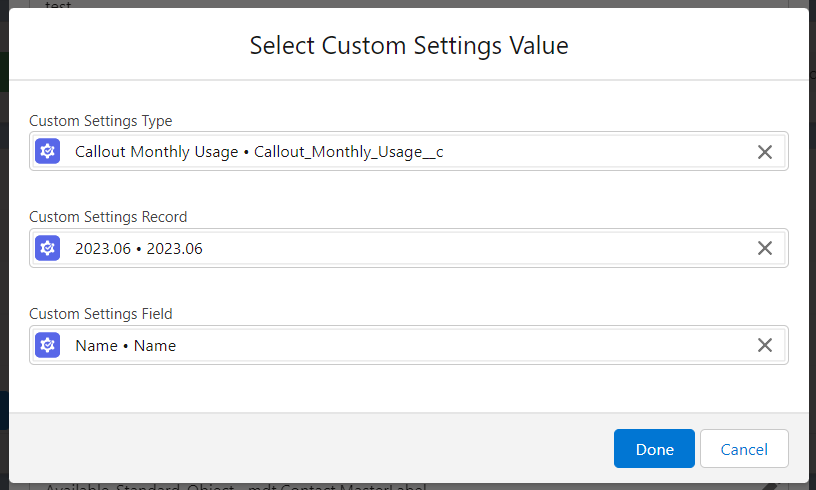
- Custom Setting: This allows you to map a field from a Hierarchy or List Custom Setting record.

- Click on the Edit icon to select a custom setting value
- Input Parameter: This allows you to map an Input Parameter received by the template into a Salesforce field. Learn more about using Input Parameters
-
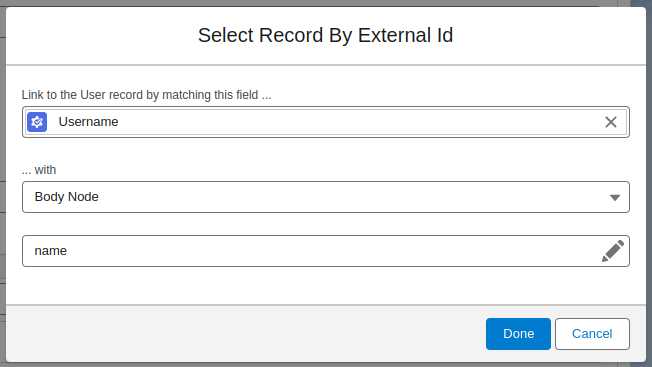
- Identify Record by External Id: When updating a field that is a lookup, you have the option to associate it with a record using an external ID field. By selecting this option, you can choose a field from the object being looked up to and a node from the response body (or a static value, custom label, custom metadata or custom setting). During the call, the template will attempt to find the record for the lookup by matching the specified field with the value from the corresponding node in the response body (or a static value, custom label, custom metadata or custom setting).


If you are mapping values into Date or DateTime fields, the received value needs to be in the standard yyyy-MM-dd format for Date fields or yyyy-MM-ddTHH:mm:ss.sssZ format for DateTime fields. If it’s not received in that format, use a formula to parse it.
The Criteria section in the field mapping allows you to select when the mapping item will happen. Clicking the input will open a popup letting you choose if you want to ignore the mapping if the incoming value is empty or (in case of an upsert) choose if you want to set that field only when a record is created or only when a record is updated.

Create New Record
Here you have the option to create a related or unrelated record to the Main Object. You can select the object type you want to create and choose how it’s related to the main object (if a main object was selected in the first step).
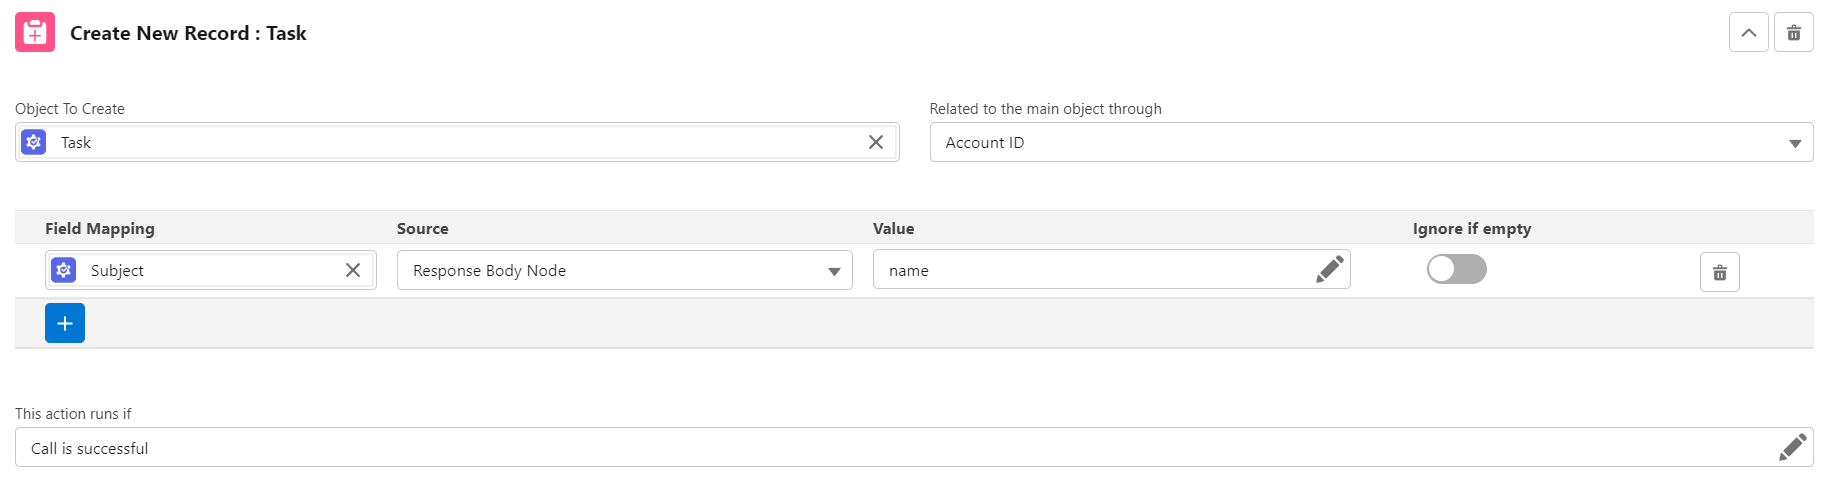
Let’s say you wanted to create a Task whenever a response is received from your external system. To create a task associated with the Account Main Object, you would choose Task as your Object Type and WhatId in the Related To dropdown.
Field mapping is similar to the “Update Main Record” action above.
Update Related Record
This option enables you to update a record related to your Main Object. If Contact was your main object, you can use this to update the Account that the object is related to after the callout is made.
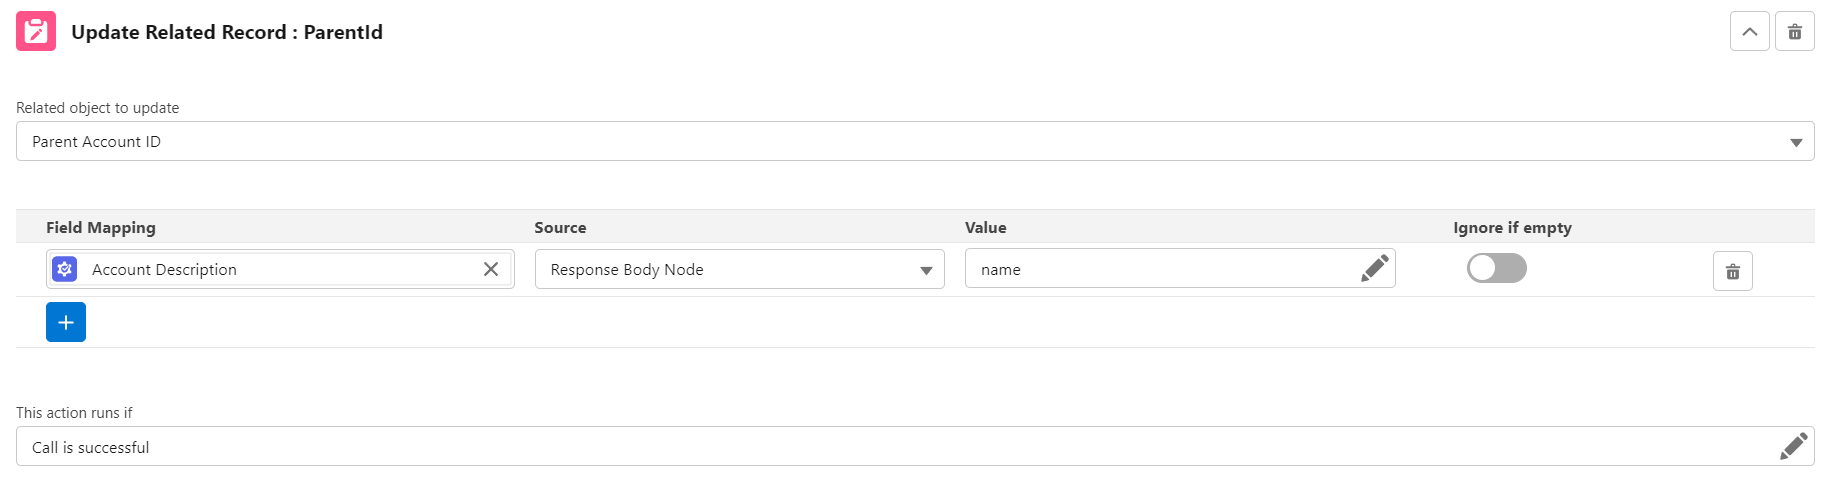
Field mapping is similar to the “Update Main Record” action above.
Upsert Single Record
This option enables you to find and update a record that can be identified by matching a Salesforce field with a node value. If no record is found, then you have the option to create it.
If you select a value in the “Related to the main object” input, only the records related to the main record are searched for, and if a record needs to be created, it will be linked to the main record.

Field mapping is similar to the “Update Main Record” action above.
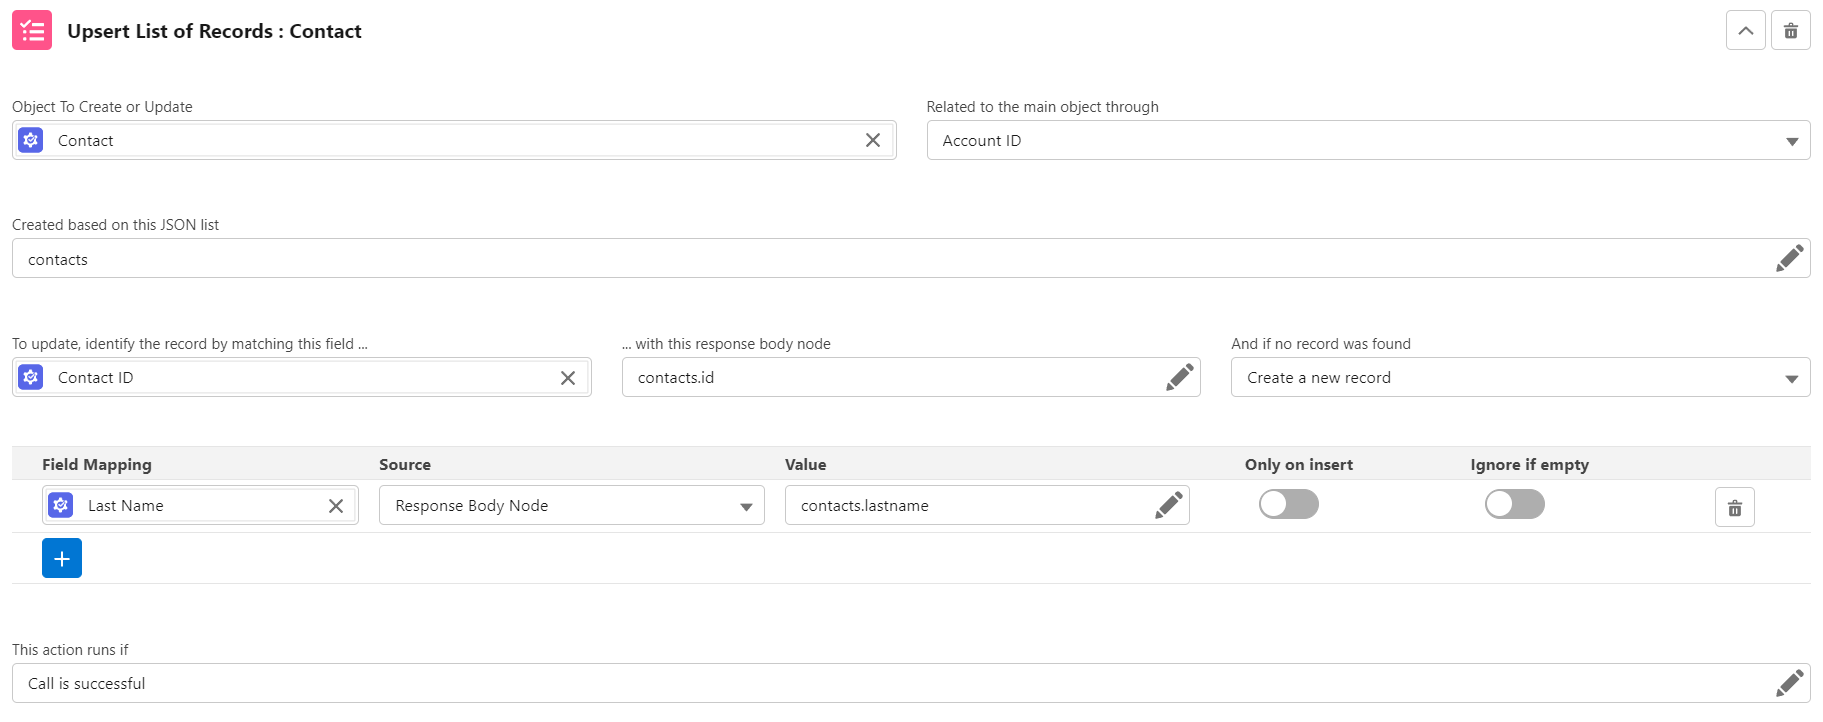
Upsert List of Records
This option enables you to update a list of records based on a JSON list from the response. Each record can be identified by matching a Salesforce field with a node value. If no record is found for each list item, then you have the option to create it.
If you select a value in the Related to the main record input, only the records related to the main record are searched, and if a record needs to be created, it will be linked to the main record.
You first need to select a JSON list from the response by clicking on the Created based on this JSON list input. After selecting a JSON list, choose how to identify each record by selecting a Salesforce field and a JSON node from inside the JSON list.
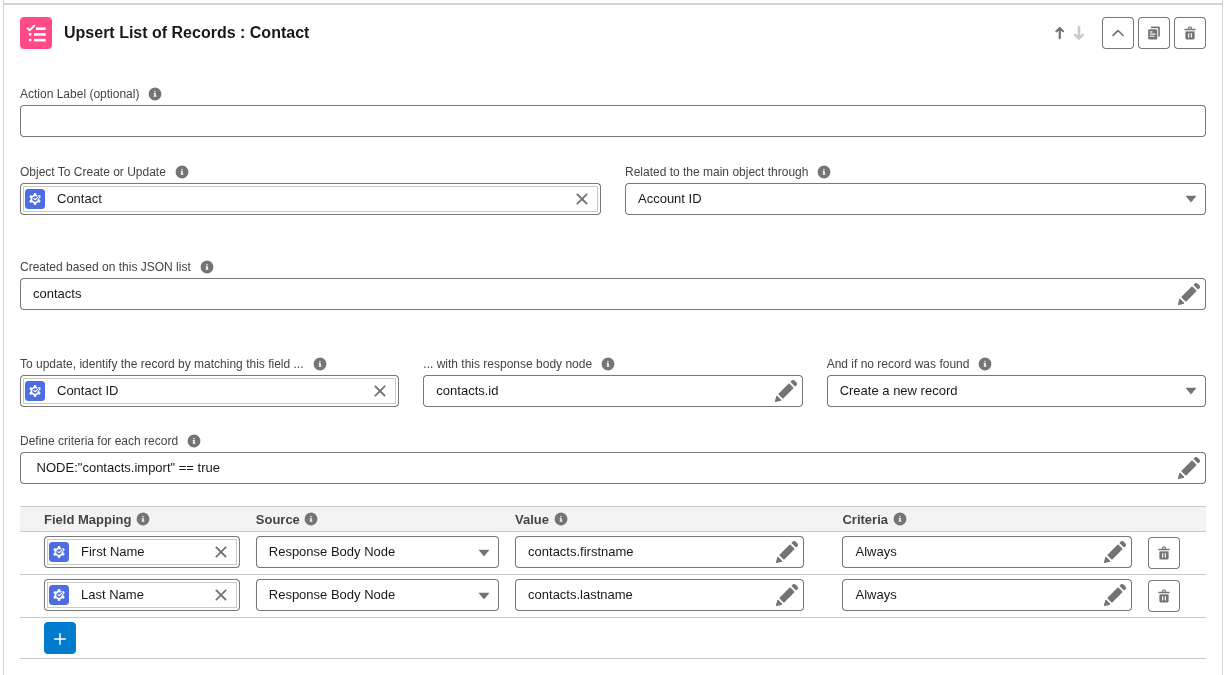
You can add criteria for each element in the list to be considered if it should be imported or not, by clicking on the Define criteria for each record field and building a formula that returns true or false.
Field mapping is similar to the “Update Main Record” action above.
Create / Update File
This option enables you to create or update an Attachment or a File (ContentDocument) based on the response.
First, you need to select what type of record you want to create: File (ContentDocument) or Attachment. After selecting, you will be able to choose the field and node used to identify an existing record to update, in case you want to update an existing file or attachment.
Field mapping is similar to the “Update Main Record” action above.
Run Autolaunched Flow
This feature allows you to utilize the capabilities of an “Autolaunched Flow (No Trigger)” flow to perform complex calculations and logic beyond basic record insertions and updates.

The process begins by selecting a flow. If the flow requires input variables, a list will be displayed for mapping. These inputs can be either the Main Record ID, individual values from the Response Body, a Response Header or the Call Log Id. Upon successful completion of the callout, the flow will be executed using the mapped input values. Only active Autolaunched flows without a trigger are available.
Run Apex
This option enables you to run an apex class as a response action.

The class you enter needs to be a global class that extends the d_wh.ResponseActionCallable2 abstract class and implements the void Run(List<Id> mainRecordIds, Integer responseCode, String responseBody) method.
Below is an example class that can be used as a “Run Apex” response action.
global class TestCallable extends d_wh.ResponseActionCallable2 {

    global override void Run(List<Id> mainRecordIds, Integer responseCode, String responseBody) {

        // Add code to handle response

    }

}
The mainRecordIds parameter contains the list of ids of the used record(s).
- If the template has no main object, this will be an empty list.
- If the template has a main object, and ‘One Record’ is selected, this list will contain one value, the Id of the main record.
- If the template has a main object and ‘Batch’ is selected, the list will contain all the Id of all the records used.
The responseCode parameter contains the response code received from the server.
The responseBody parameter contains the received response body as string.
Setting the conditions for an action to run
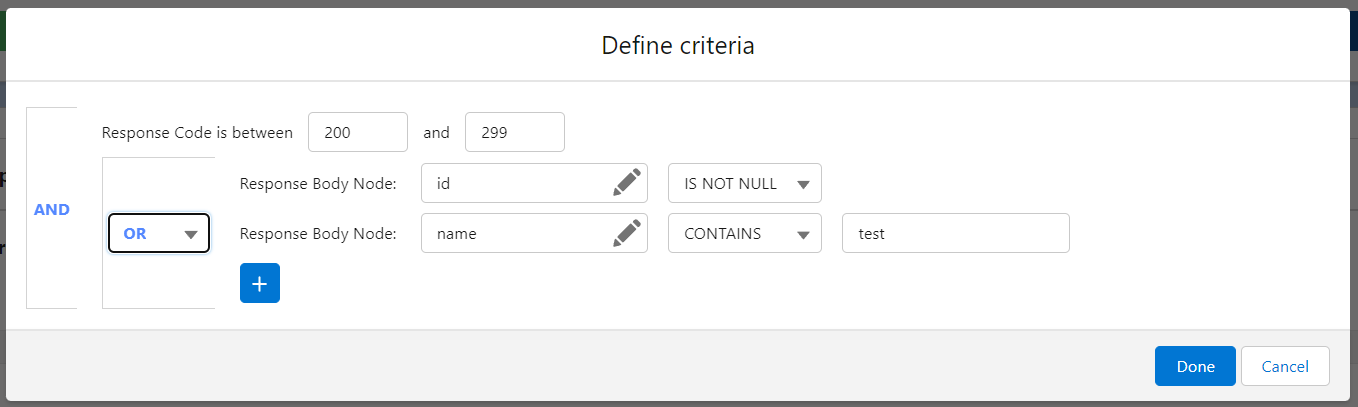
For each response action, you have the option to select if the action will run. By default, the actions will run if the request is successful (response code between 200 and 299). You can customize that by clicking inside the “This action runs if” input.
It will open a popup where you can add criteria.

Here, you can specify the response codes this action should run for, as well as custom criteria from the response body.
