Step 3: Inbound Template Actions
Response Actions Section
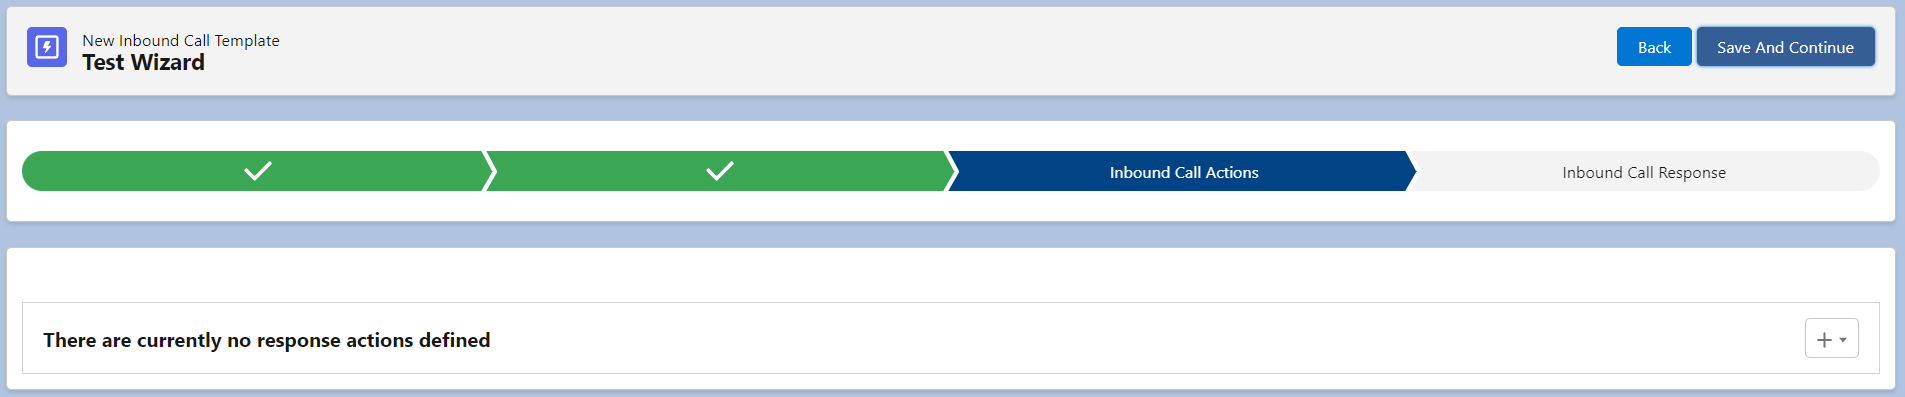
Here you will define actions based on the received call. Click on the “+” button to select what type of action you want to add.
We have provided you with a guide on how to use these options:
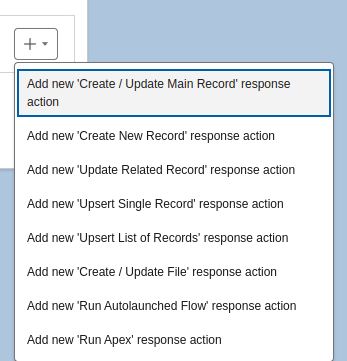
Create / Update Main Record: This is a type of action you can only add once per template. You have the option to create or identify and update the main record for this call by matching a field from the Salesforce object with a value from the request. If you choose to create or update a main record, you will be able to map further fields from your inbound call body. Furthermore, the main record found (or created) can be used in the next actions as a parent.
Create Record: Here you have the option to create a new record, related or unrelated to the main record identified above. You can select the object type you want to create and choose how it’s related to the main object.
Update Related Record: This option enables you to update a record related to the main record identified above. For example, if Contact was your main object, you can use this to update the Account that the object is related to after the inbound call is made. Similar to the previous options, you have the ability to map fields associated with your related record here.
Upsert Single Record: This option enables you to update a record that can be identified by matching a Salesforce field with a node value. If no record is found, then you have the option to create it.
Upsert List of Records: This option enables you to update a list of records based on a list from the JSON request. Each record can be identified by matching a Salesforce field with a node value. If no record is found for each list item, then you have the option to create it.
Create / Update File: This option enables you to create or update a Salesforce Attachment or File (ContentDocument) based on the JSON request. Each file can be identified by matching a Salesforce field with a node value. If no record is found for each list item, then you have the option to create it.
Run Autolaunched Flow: This feature allows you to utilize the capabilities of an “Autolaunched Flow (No Trigger)” to perform complex calculations and logic beyond basic record insertions and updates.
Run Apex: This option enables you to run an apex class as an inbound action.
NOTE: You can change the order of your actions by clicking on the arrows to the right of each action. The actions will run in the order you have defined them.

NOTE: You can clone an action by clicking on the clone button to the right of each action. It will create a copy of the selected action.

Each action can have a label (optional field), to easily identify the actions when you have a lot of them.
NOTE: If your actions take too long and you want to decrease the call response type, you can make some actions as “asynchornous”.
Create / Update Main Record
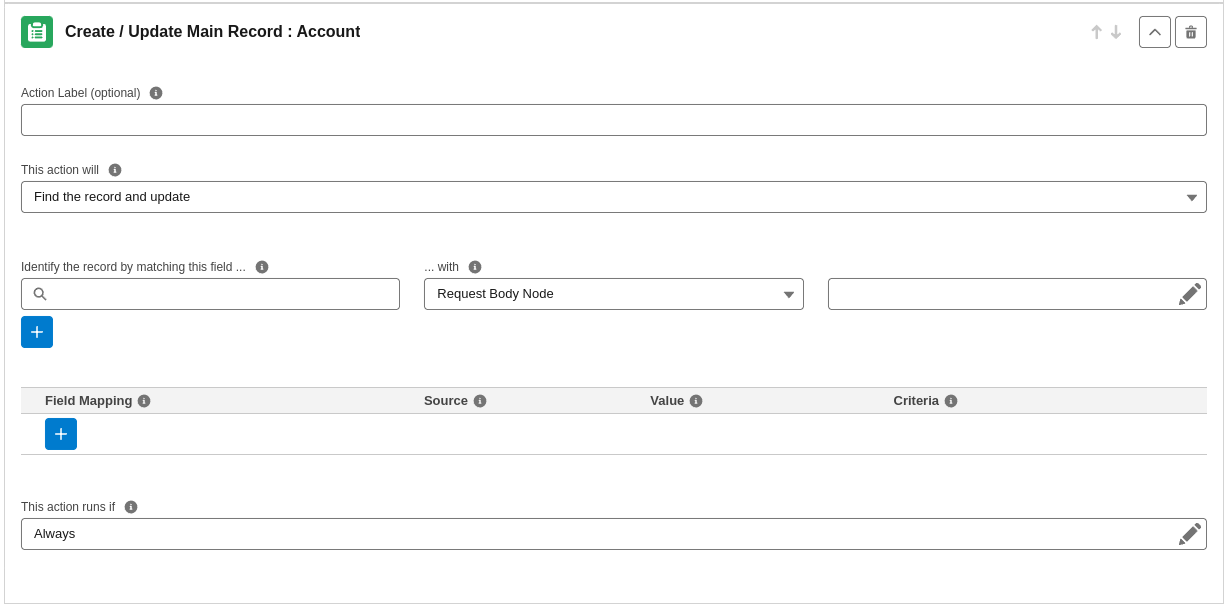
The first question you are asked is what you want to do regarding the main record. Do you want to always create one with every call? Do you want just to find a record and return values from it in the response? You can update an existing record and even create one of not found. What you select here influences what you see in the rest of the component.

If you choose any of the Find … options, you will see the record identification settings. In the field selector, you can choose which Salesforce field to search by, then select what to use to match that field. This can be a URL parameter, a request body node, or even a formula to build a unique identifier from the request. Let’s say in this example we have ‘Contact‘ as our main object and we want to identify and update a Contact record. If we have a node in the request body for the contact email, we can use this in our action to identify the Contact record we want to update.

You can add additional matching criteria by clicking ‘+’. If you add an additional line, it will be used as a backup match to identify a record. If the first match doesn’t find anything, the second match will be attempted, and then the third.
If you select to create or update in the first picklist, you will also see the field mapping options, so we can map what fields we would like to set on the record. Select the “+” button below “Field Mapping” to map fields to update on your record.

In the Source dropdown you have the following options:
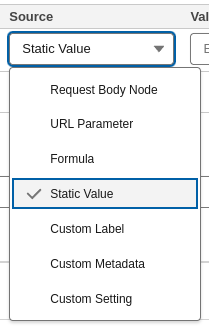
- If you choose Static Value, the field will be updated with that exact provided value every time the callout is made. You can provide the specific value in the “Value” field. This is useful if you want to set a status or a flag on the record.
- Selecting Request Body Node will allow you to update the field with a value from the Request Body:
- Click on the Edit icon at the right of the Value input to select a request body node to use to map into the field
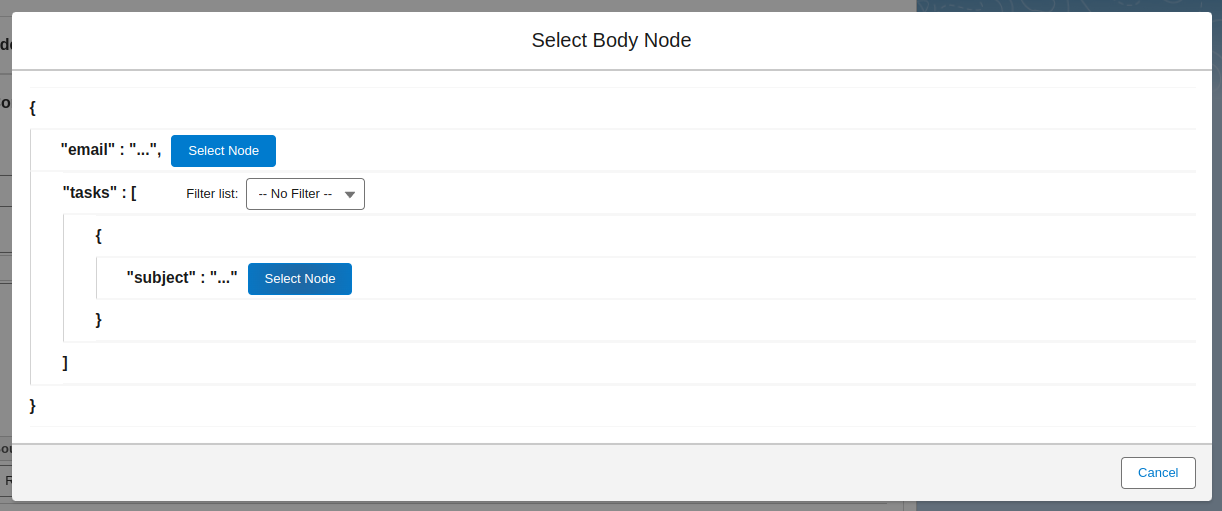
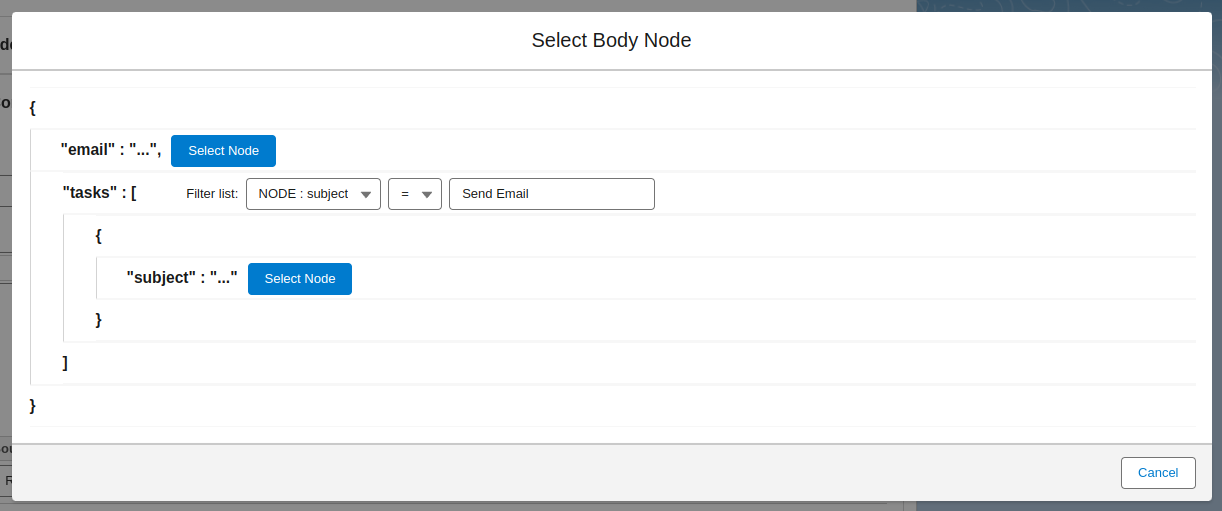
- If you encounter a list, you also have the option to add a filter on that list BEFORE clicking on “Select Node”. If you set the filter and it’s part of the JSON path, the filter will be included in the selected path and will be applied when the node is saved in the field.
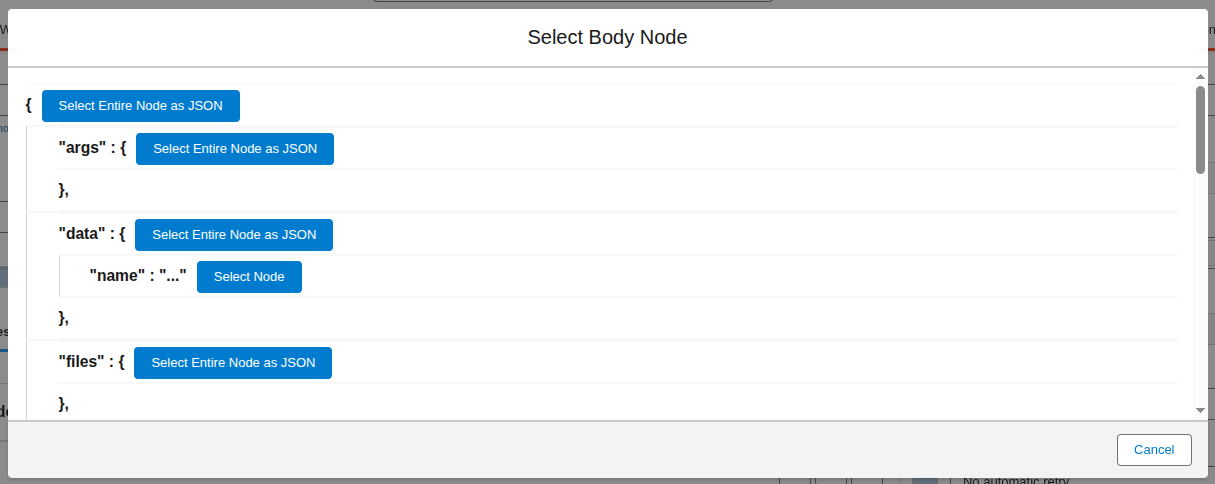
- You are also able to select an entire JSON node to be stored as JSON in a Salesforce text field. Simply click the Select Entire Node as JSON button to map the whole JSON node into the field.
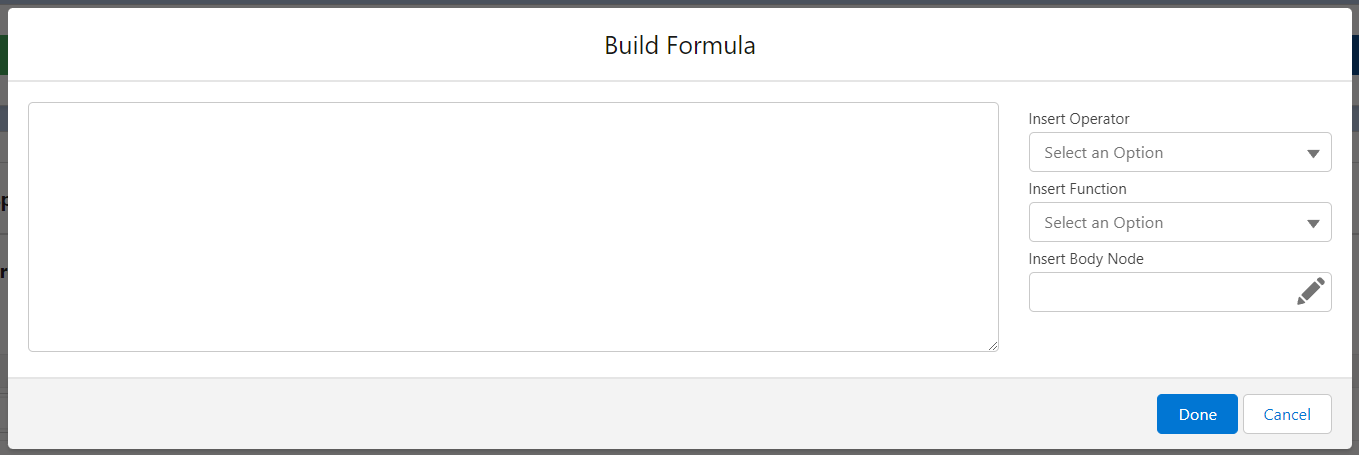
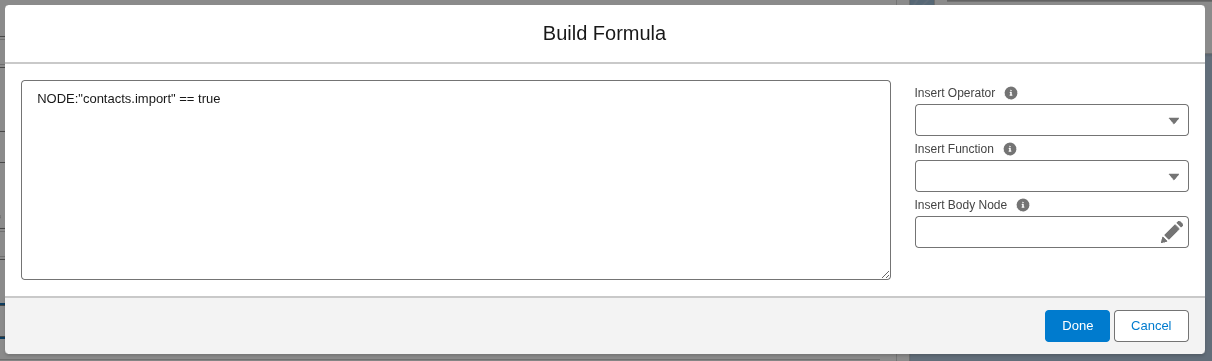
- Formula: This allows you to build a formula using values from the request body.
- Click the Edit icon to edit the formula. See more details in the “Using Formulas” section of this user guide.
- Custom Label: This option allows you to provide a custom label name to be mapped in that node.
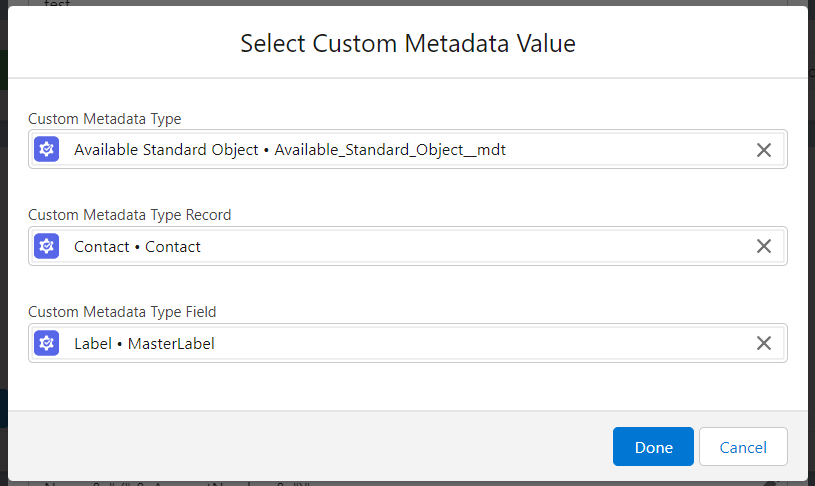
- Custom Metadata: Custom Metadata: This allows you to map a field from a Custom Metadata Type record into the record field.

- Click on the Edit icon to select a custom metadata value
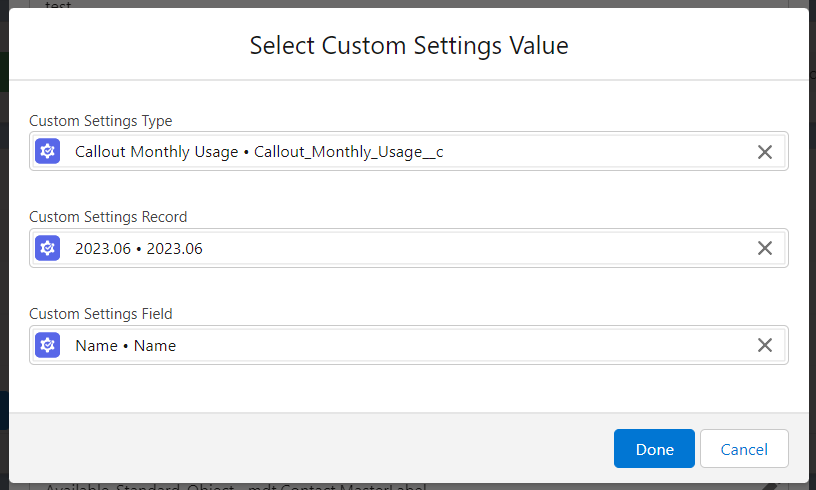
- Custom Setting: This allows you to map a field from a Hierarchy or List Custom Setting record.

- Click on the Edit icon to select a custom setting value
- If you choose URL Parameter, you will be able to enter the incoming URL parameter to use to map into the field.
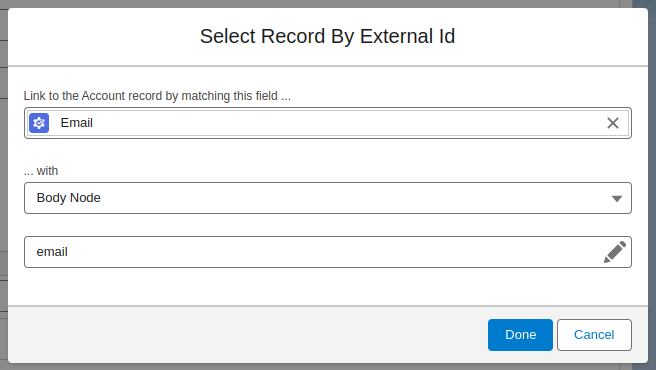
- Identify Record by External Id: When updating a field that is a lookup, you have the option to associate it with a record using an external ID field. By selecting this option, you can choose a field from the object being looked up to and a node from the request body. During the call, the template will attempt to find the record for the lookup by matching the specified field with the value from the corresponding node in the request body.


If you are mapping values into Date or DateTime fields, the received value needs to be in the standard yyyy-MM-dd format for Date fields or yyyy-MM-ddTHH:mm:ss.sssZ format for DateTime fields. If it’s not received in that format, use a formula to parse it.
The Criteria section in the field mapping allows you to select when the mapping item will happen. Clicking the input will open a popup letting you choose if you want to ignore the mapping if the incoming value is empty or (in case of an upsert) choose if you want to set that field only when a record is created or only when a record is updated.

Create Record
Here you have the option to create a new record, related or unrelated to the main record identified above.. You can select the object type you want to create and choose how it’s related to the main object. To create a new record, select the Add New ‘Create Record’ Action.
Choose your Object Type. Because we have identified the main record in the previous step, you can select how to relate this new record to the main record.
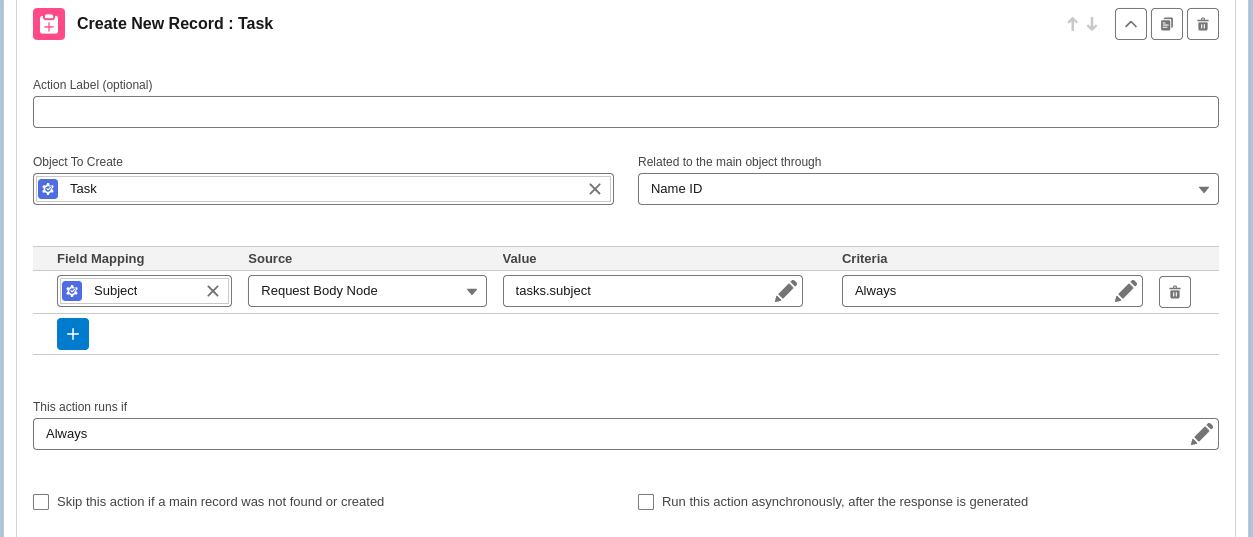
You can map fields similarly to the Find/Update the Main Record action above.
Update Related Record
Similar to our previous examples, this option allows you to update a record related to your main object. For example, if you wanted to update the parent account record related to the main Contact record.
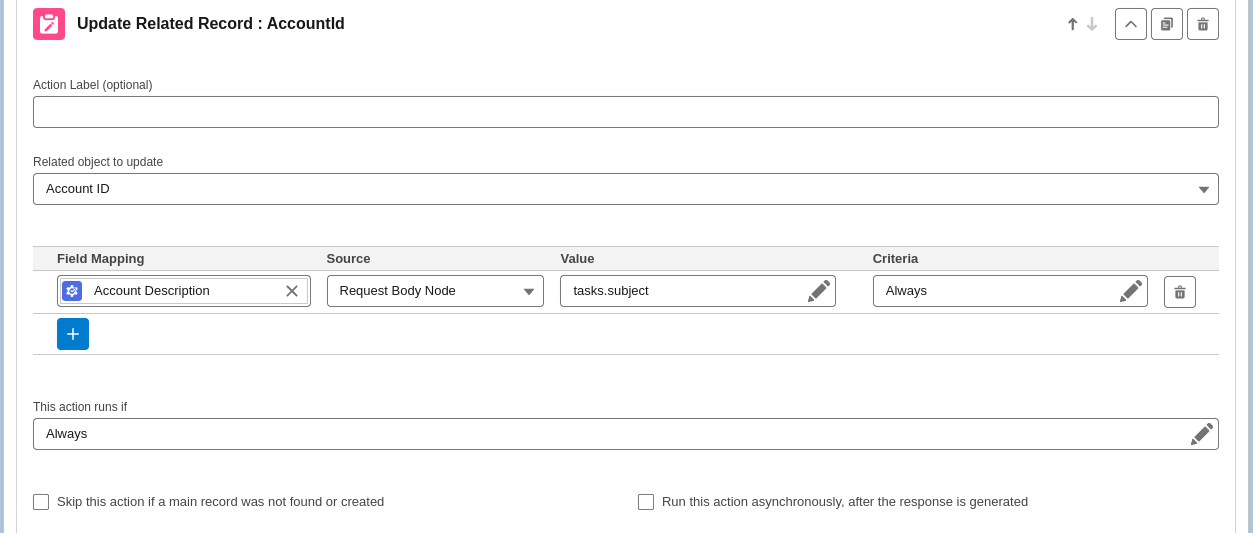
You can map fields similarly to the Find/Update the Main Record action above.
Upsert Single Record
This option enables you to update a record that can be identified by matching a Salesforce field with a node value. If no record is found, then you have the option to create it.
If you select a value in the “Related to the main object through” input, only the records related to the main record are identified, and if a record needs to be created, it will be linked to the main record.
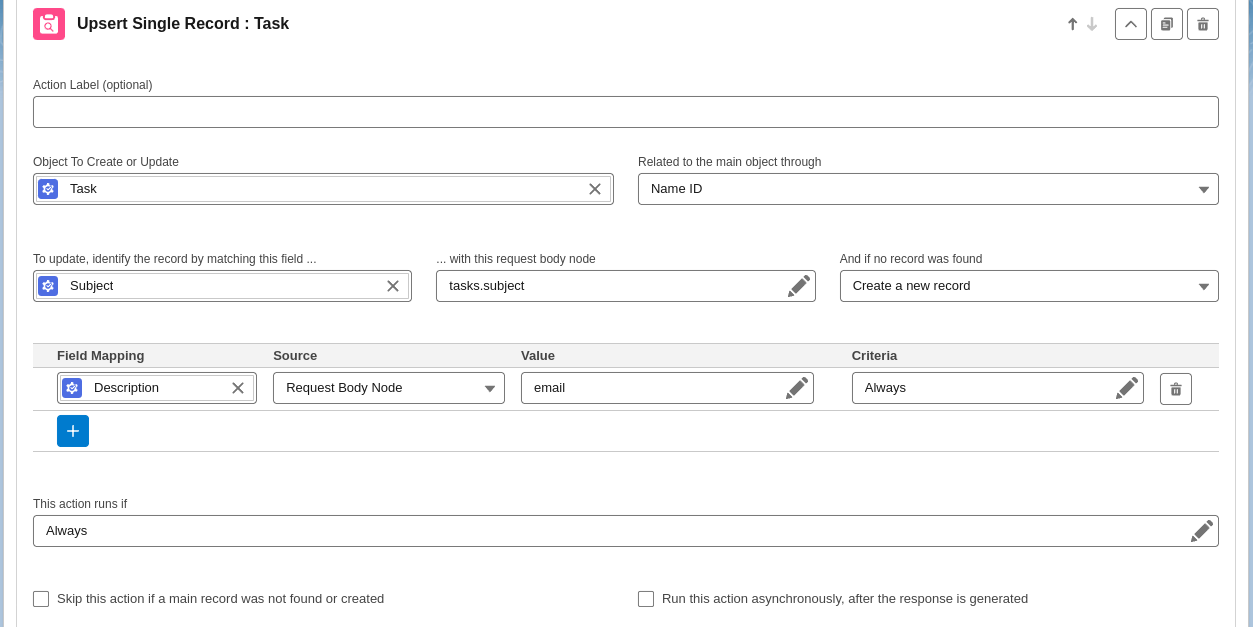
You can map fields similarly to the Find/Update the Main Record action above. Additionally, you can use the “Only on insert” or “Only on update” toggles in the Criteria column to limit some of the mapping to the create or update action only.
Upsert List of Records
This option enables you to update a list of records based on a list from the JSON request. Each record can be identified by matching a Salesforce field with a node value. If no record is found for each list item, then you have the option to create it.
If you select a value in the “Related to the main object through” input, only the records related to the main record are identified, and if a record needs to be created, it will be linked to the main record.
You need to select a JSON list in the “Created based on this JSON List” input. After selecting a JSON list, choose how to identify each record by selecting a Salesforce field and a JSON node from inside the JSON list.
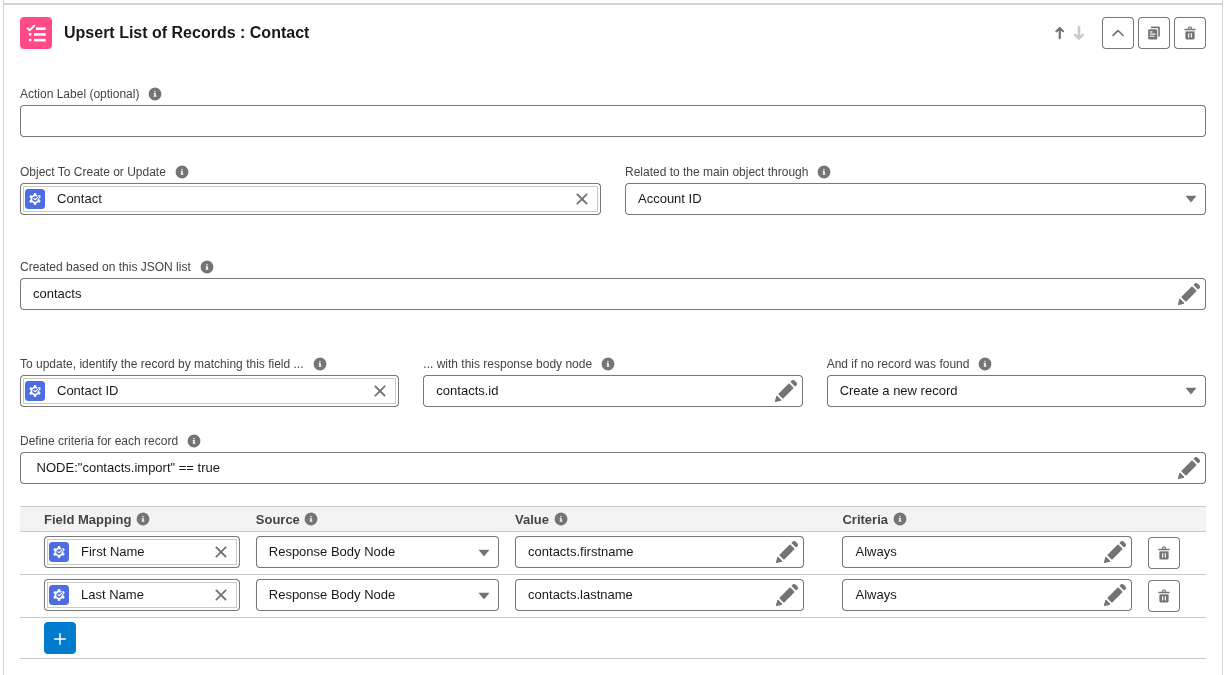
You can add criteria for each element in the list to be considered if it should be imported or not, by clicking on the Define criteria for each record field and building a formula that returns true or false.
You can map fields similarly to the Find/Update the Main Record action above. Additionally, you can use the “Only on insert” or “Only on update” toggles in the Criteria column to limit some of the mapping to the create or update action only.
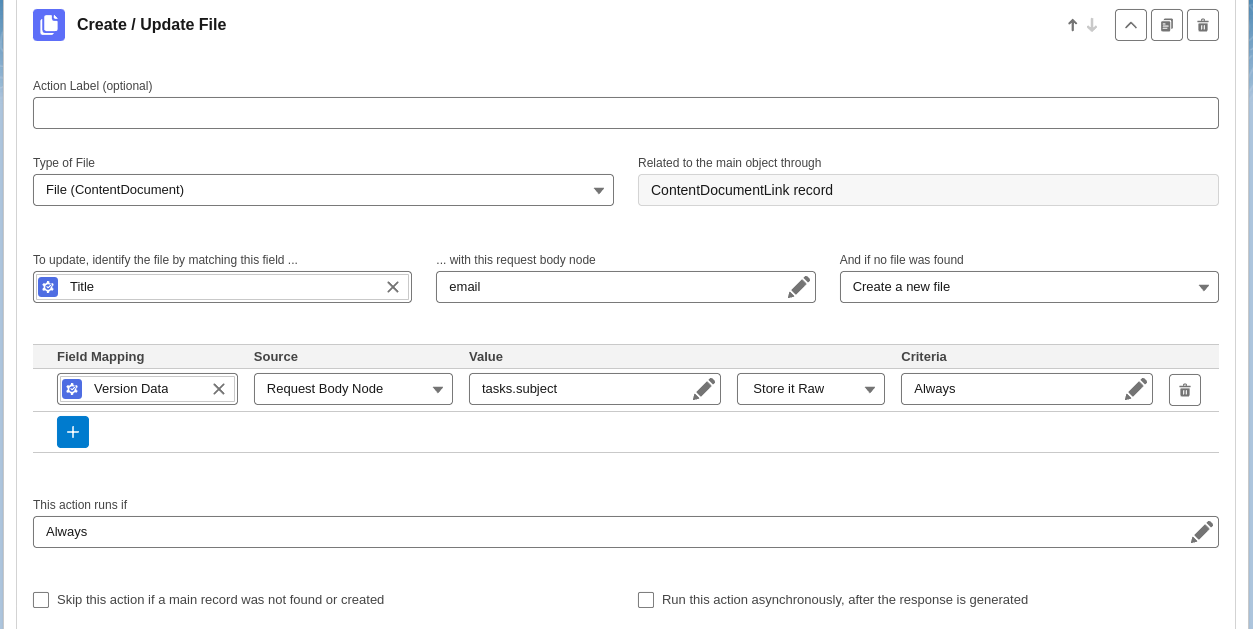
Create / Update File
This option enables you to create or update an Attachment or a File (ContentDocument) based on the request.
First, you need to select what type of record you want to create: File (ContentDocument) or Attachment. After selecting, you will be able to choose the field and node used to identify an existing record to update, in case you want to update an existing file or attachment.
Then you can map fields from the JSON request or static values, similarly to the Find/Update the Main Record action above. Additionally, you can use the “Only on insert” or “Only on update” toggles in the Criteria column to limit some of the mapping to the create or update action only. In case you select Body or VersionData fields, you can also choose to decode from base64 or hex if the file comes in in that format.
Run Autolaunched Flow
This feature allows you to utilize the capabilities of an “Autolaunched Flow (No Trigger)” to perform complex calculations and logic beyond basic record insertions and updates.

The process begins by selecting a flow. If the flow requires input variables, a list will be displayed for mapping. These inputs can be either the main record ID, individual values from the request body or the log id. When the inbound call takes place, the flow will be executed using the mapped input values.
Only active Autolaunched flows without trigger can be selected.
Run Apex
This option allows you to run an apex class when the inbound call is received.
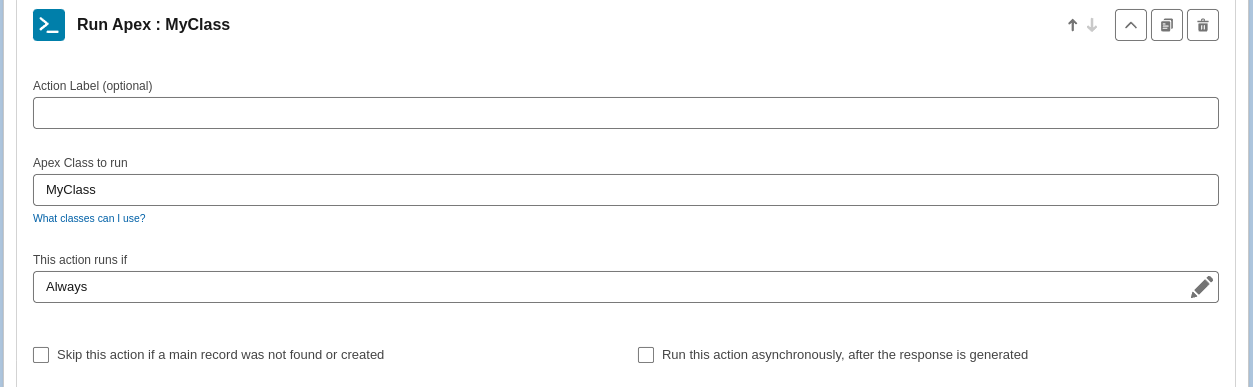
The class you enter needs to be a global class that extends the d_wh.InboundActionCallable2 abstract class and implements the d_wh.InboundActionCallable2.CallResponse Run(Map<String, String> parameters, Map<String, String> headers, String requestBody) method.
Below is an example class that can be used as a “Run Apex” inbound action.
global class TestCallable extends d_wh.InboundActionCallable2 {

    global override d_wh.InboundActionCallable2.CallResponse Run(Map<String, String> parameters, Map<String, String> headers, String requestBody) {

        // Add code to handle inbound call
        return null;
    }

}
The parameters parameter contains the URL parameters received by the inbound call.
The headers parameter contains the headers received by the inbound call.
The requestBody parameter contains the received body as string.
The d_wh.InboundActionCallable2.CallResponse return object is reserved for future use. Return null for now.
Call Action Criteria
For each call action, you have the option to select if the action will run. By default, the actions will always run. You can customize that by scrolling down to the “This action runs if” input and click on it. That will open a popup where you can refine the creitria.
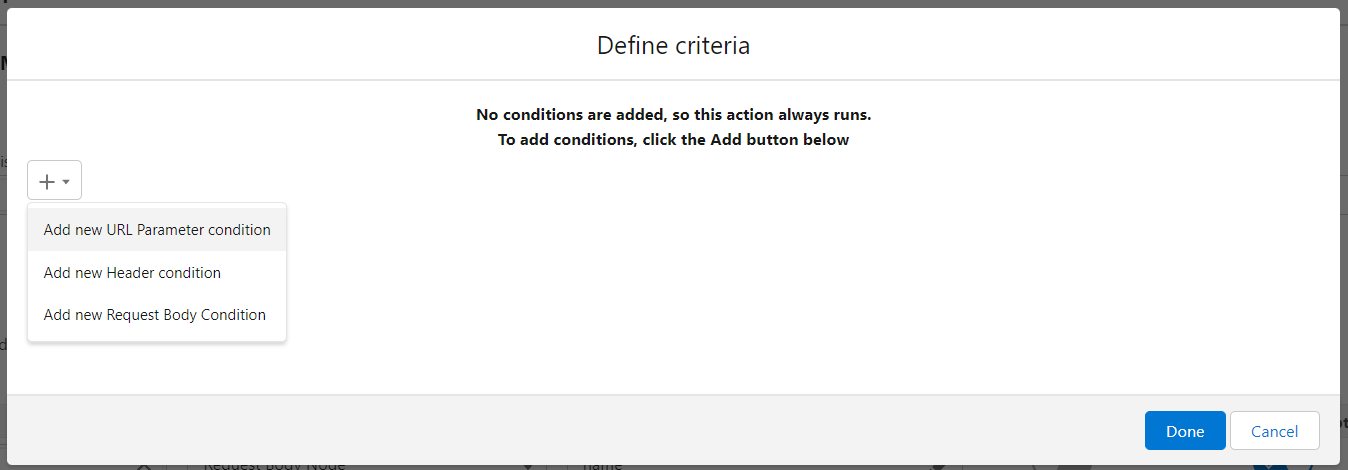
You can specify custom criteria based on header values, URL parameters, as well as the request body items.

Additionally, the action can be skipped if the main action “Find/Update a Main Record” failed to identify or create a record. You can set that by checking the “Skip this action if a main record was not found or created” checkbox.

